First of all, you need a decent photo program. I strongly reccomend Adobe Photoshop, JASC Paintshop Pro, or Corel Draw. Any photo program that can support layers will do~! I also reccomend that before you get started is that you familiarize yourself with the program first. Just downloading, installing, and starting it up right away won't do any good in this tutorial! XD
This tutorial is based on JASC Paintshop Pro (because it's a great program for starting newbies and I'm too lazy to take 50 years to type up a Photoshop or Corel Draw tutorial >_<)
When making a new image, make sure the height and width of the image isn't too small or thin. The average paper span I try to stay within is 500 x 700 pixels (or 6in x 9in).

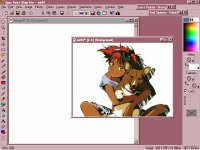
Now's the fun part! Feel free on how you'd like your stationary to look like. It can either have a blank background with an image design or maybe a faded image for the background. This is where layers come in handy, because when it comes to overlapping images on top of images, layers will help you a LOT. In this example, I'm going to do a Cowboy Bebop stationary starring Ed, and I'm going to do a faded background along with a main image. This stationary will be 640 by 480 horizontal-wise.
First I'll do the faded background effect (I'll keep the background fading white so that it won't waste so much printer ink). Copy the image you want to make a background of and paste it as a new layer in the blank stationary template. After the image is pasted, feel free to use the deform tool and resize the image to your satisfaction (for photoshop and paintshop, keep hold of the Shift Button to maintain it's structure)

To fade it out, on the layer palette, you can set the image's transparency. (When you set the opacity too high, the people that use the stationary will not be able to write over the image). I normally set the opacity to 20-25%

Move your image around the way you want to place it with your mover tool. Next, go to your layer palette and create a new layer. The new blank layer will be for your lines. For the easy way of achieving lines in your stationary, simply go to your text tool and go to Arial and press the "_" key as long as the stationary will go and for even lines, just repeat it line after line. For me, create a seperate line pattern to just paintbucket the line pattern into the layer. But whatever method you use, try to have your lines even and spread off the page (for better looking printing).

Now I'll be adding in a main image (whether or not you want to add in a main image is up to you). I resized the original Ed image to one that'll be small enough to fit in the corner (don't make your main image too big or else there will be barely enough space for anybody to write on). I simply copy the resized image as a new layer.

Then I take the magic wand tool and clear away the white in the image so just Ed and Ein will stand out.

For the final Text decoration, I just create another new layer and use the Text Tool and pick out a cute font that will match the stationary theme (Make the text title big enough to see but not too big to block out too much space). I put the floating text on the new layer and use the mover tool to where I want the text placed.

Then I select the layer with the lines and clear out the lines to make the title stand out.

And Voila! Finished stationary! I just merge the layers all together, rotate it to the side for convenient printing, and save it as a JPEG.

Why JPEG and not GIF or BMP? Because GIFs don't resize well when somebody wants to resize the stationary and BMPs take up too much space in my opinion >_<
And those are your basic stationary making tips! As you get a little more advanced, your stationaries can get a bit more kookier and fun along the way XD! Just remember to have fun making them!